How to: Install and remote debug a java application in Docker with IDEA IntelliJ

IDEA IntelliJ has a plugin for docker integration which supports docker container creation, configuration and deployment.
This article will guide you how to use the docker integration plugin and remote debug a simple java application running in a docker container.
What is used: IDEA IntelliJ 15.0.1, Docker 1.9.0, JDK 1.8, Maven 3.3, Docker integration plugin 1.7.4
Step 1 – Install Docker integration plugin
Go to Plugins under IntelliJ preferences and look for Docker integration plugin and install it.
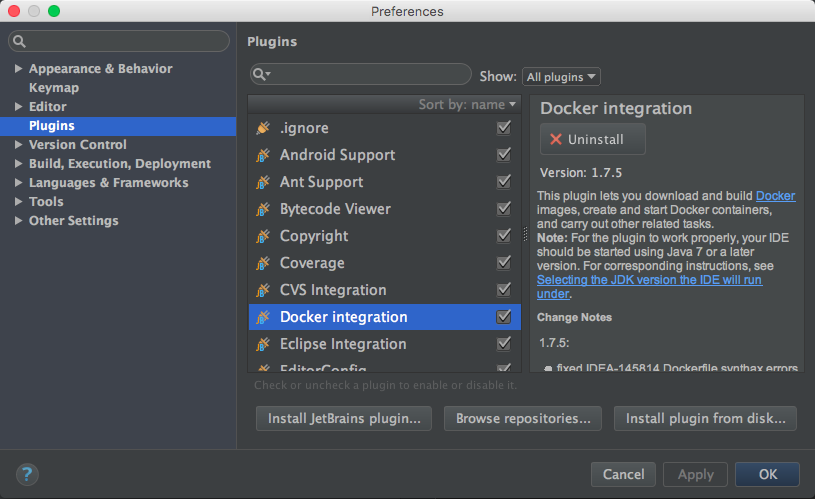
Docker integration plugin
Step 2 – Create a project
After restart of IntelliJ, create a new maven based project or clone and open my simple spring-boot example from Github.
Step 3 – The magic (part 1): Dockerfile
One important part is the Dockerfile. This file describes the image for all containers.
Create a new file in the root directory of your project with name „Dockerfile“ and insert this: (for the different Dockerfile commands, take a look at the Dockerfile reference)
# get latest debian docker base image
FROM debian:latest
# make sure wget and tar are installed
RUN apt-get update && apt-get install wget tar -y
# create and set working directory
RUN mkdir /opt/jdk18
WORKDIR /opt/jdk18
# tricky download of oracle jdk 1.8
RUN wget --no-cookies --no-check-certificate --header "Cookie: oraclelicense=accept-securebackup-cookie" "http://download.oracle.com/otn-pub/java/jdk/8u66-b17/jdk-8u66-linux-x64.tar.gz" -O jdk.tar.gz
# unpack jdk to actual folder (ignoring root folder from archive)
RUN tar xvf jdk.tar.gz --strip 1
# clean up
RUN rm jdk.tar.gz
# set up environment for jdk
ENV JAVA_HOME=/opt/jdk18
ENV PATH=$PATH:$JAVA_HOME/bin
# set working dir
WORKDIR /root

# deploy the app (jar)
ADD target/spring-docker-app-1.0-SNAPSHOT.jar /root
The Dockerfile is based on latest debian image for docker. It installs wget and tar, downloads and installs JDK 1.8 and sets up the environment variables for the JDK.
Pay attention to the last line of your Dockerfile – it copies/deploys the application .jar-file into the container image. – Modify this line to your needs.
Step 4 – The magic (part 2): Docker run configuration
Create a new Run configuration based on „Docker Deployment“ template in IntelliJ and give it a speaking name like „Run in docker“.
Next, configure your new Run configuration:
Tab „Deployment“:
In the „Server“ entry, create a new Server configuration that points to your remote docker host and confirm the dialog with „OK“.
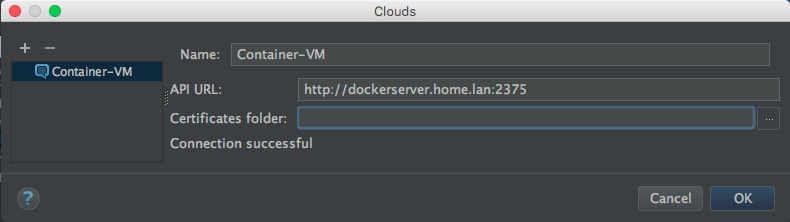
Docker server configuration dialog
Back in the deployment tab, select „Dockerfile“ as deployment type.
Give the container and image a name. Every docker container is based on an image. The image will be generated once, from the Dockerfile we created before and its name is mandatory.
The container name is optional. If it is left blank, every container will get a random name after startup.
Now select a debug port for java remote debugging. I use: 14096.
Under the debug port option the command line parameters for remote debugging are shown by IntelliJ – containing our debug port 14096. Please copy this line, we will need it later.
Add a maven package goal for the application in the „Before launch“ part. This is important, because before every deployment a new application jar is created and injected into a new container image.
Take a look at all settings on the following screenshot:
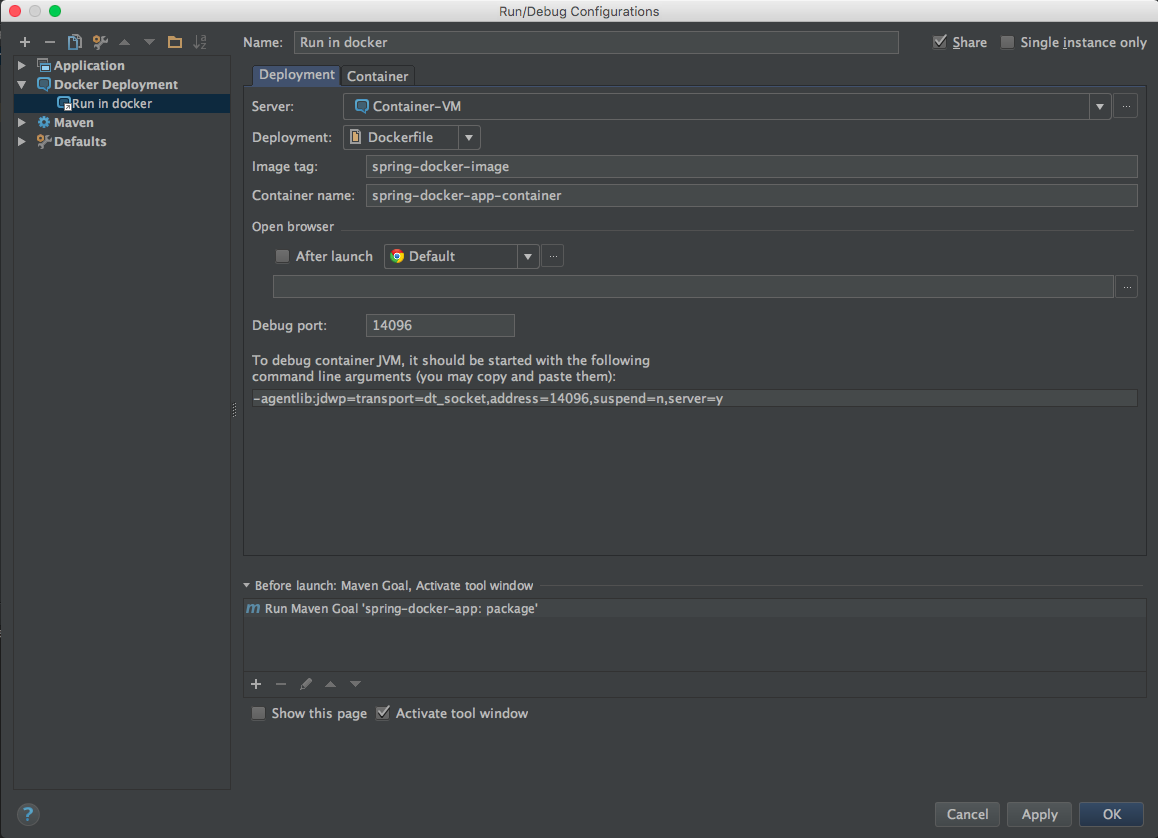
Deployment configuration overview
Now change to the „Container“ tab:
Click on the green arrow to create a new JSON file with container settings. This file contains all properties of a container, f.i.: mapped ports, mounted volumes etc.
We will edit the new JSON file later.
Every container needs an entry point. This is a command that will be executed when the container starts up. In our case we start a new java vm with our app in JAR format and the remote debugging options we copied earlier. The line for this command should look like this: (again: Change the application name to your needs)
java -agentlib:jdwp=transport=dt_socket,address=14096,suspend=n,server=y -jar spring-docker-app-1.0-SNAPSHOT.jar
Overview of all container options:
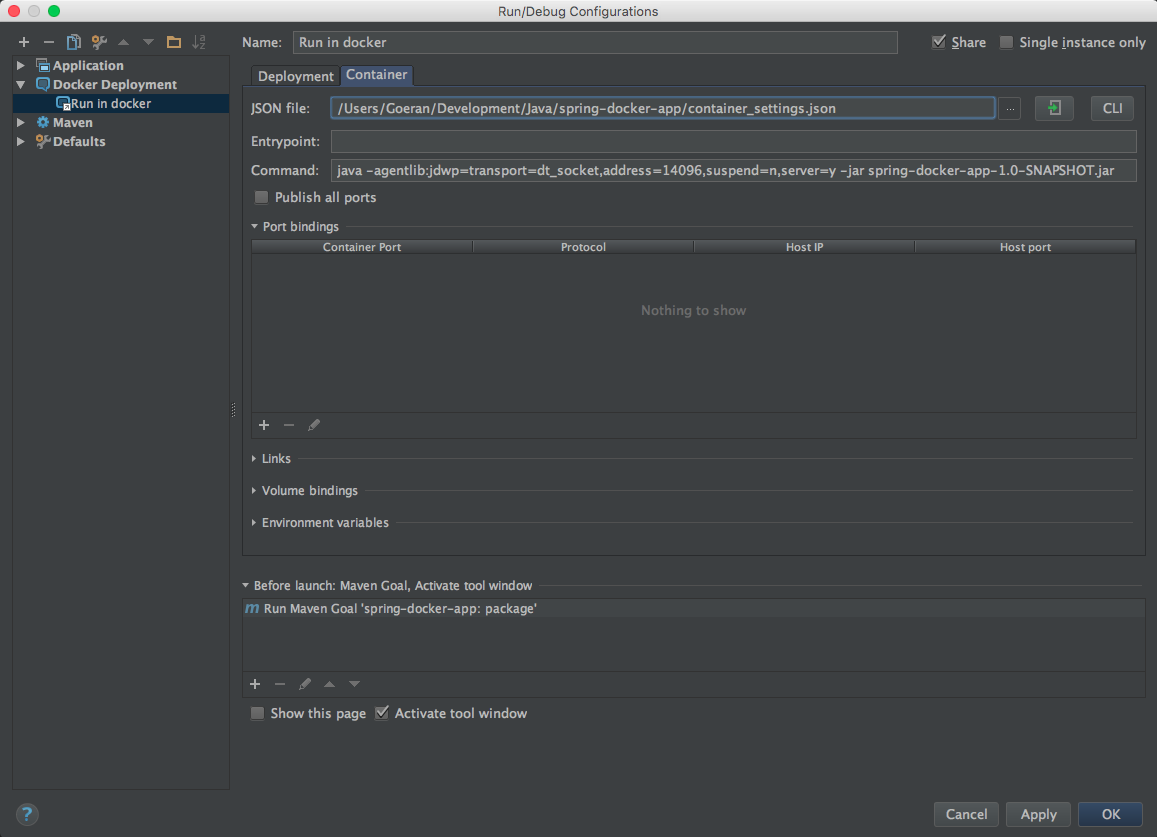
Container configuration overview
Confirm the dialog with „OK“ and navigate to the container_settings.json file.
The insider tip: Because of a bug or incompatibility problem between the Docker integration plugin in version 1.7.x and the newer Docker version 1.9 we need to modify the file like the one shown below:
{
  "_comment": "FOR DETAILED FORMAT LOOK AT https://docs.docker.com/reference/api/docker_remote_api_v1.16/#create-a-container",
  "AttachStdin": true,
  "OpenStdin": true,
  "ExposedPorts": {
    "8080/tcp": {},
    "14096/tcp": {}
  },
  "HostConfig": {
    "PortBindings":{
      "8080/tcp": [{ "HostPort": "8080", "HostIp":"0.0.0.0" }],
      "14096/tcp": [{ "HostPort": "14096", "HostIp":"0.0.0.0" }]
    }
  }
}
Take a look at „ExposedPorts“ and „PortBindings“. ExposedPorts tells docker which ports of the container should be available/exposed. PortBindings map ports between the virtual container network interface and the real host interface of the remote machine.
In the file above we map our debug port (14096) and spring-boot web server port (8080) and make it available outside of the docker container.
That’s all!
Now you can startup your new run configuration with docker deployment. The first start takes a bit longer because a new docker image will be created and the JDK download and installation will take a while.
If you set a breakpoint in App.main() method and start your docker run configuration in debug mode, the app should hit the breakpoint and halts.
With exposing and mapping of port 8080 the app should also be reachable via web browser http://x.x.x.x:8080/.
Hint: You can watch the image and container creation during startup. Docker will be handled as „Application Server“ in IntelliJ. Just show the „Application Servers“ tab with menu View / Tool Windows / Application Servers.
Have fun experimenting with Docker in IntelliJ!
🙂